
Quick answer: Fill the boiler to just below the safety valve with cold water, add medium-fine ground coffee to the basket without tamping, heat on medium-low, and remove from heat the moment coffee starts gurgling into the top chamber. Run cold water over the base to stop extraction. Total hands-on time: under 10 minutes.
The moka pot makes some of the strongest, most satisfying coffee you can brew at home — bold, concentrated, and deeply aromatic. It was invented by Alfonso Bialetti in 1933 and remains one of the most popular brewing tools in the world. This guide walks you through every step, from filling the boiler to pouring your cup, plus how to fix the most common problems.
What You'll Need
Before you start, have these ready:
- A moka pot (any size — 3-cup and 6-cup are most common)
- Medium-fine ground coffee (finer than drip, coarser than espresso — like coarse table salt)
- Cold or room-temperature water
- A stove burner or heat source (gas, electric, or induction with an adapter)
- A small cup or mug
Grind size tip: Most pre-ground "espresso" coffee from the supermarket is actually good for moka pot. A dedicated burr grinder lets you dial in more precisely — aim for medium-fine, not as fine as espresso. Too fine causes over-extraction and bitter, muddy coffee; too coarse produces weak, watery results.
How to Use a Moka Pot: Step-by-Step
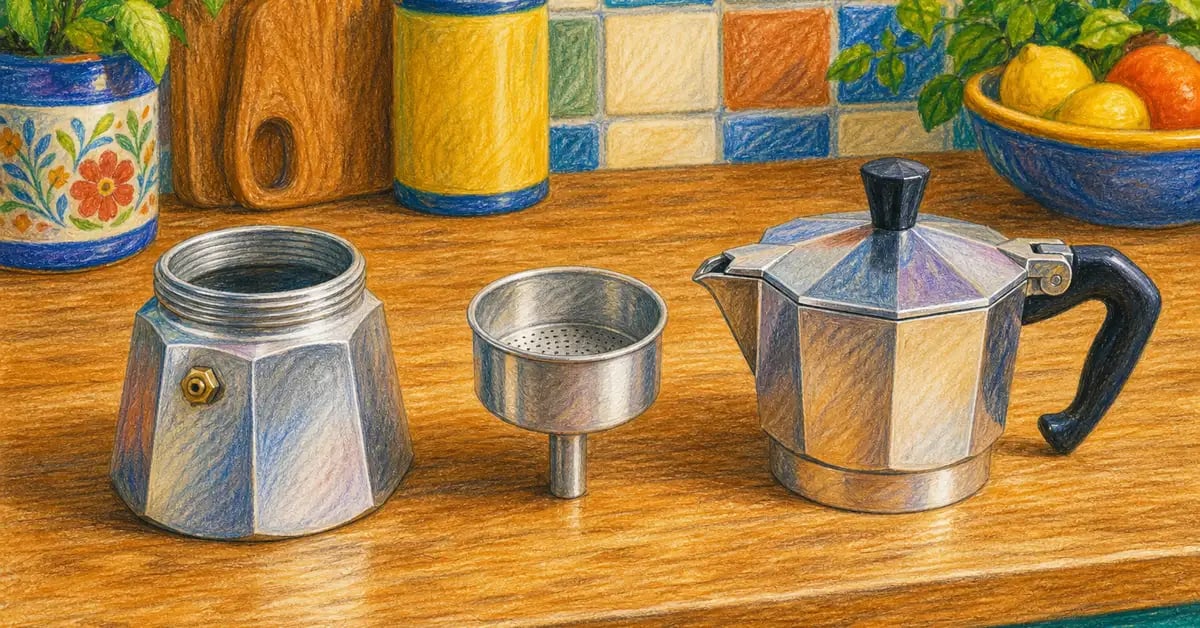
Step 1: Fill the Bottom Chamber
Unscrew the moka pot at its middle and separate the three parts: the bottom boiler, the filter basket, and the top collector. Fill the bottom boiler with cold water up to just below the safety valve — the small metal relief valve on the side. Do not cover it. The safety valve is there to release pressure if something goes wrong; blocking it is a safety hazard.
Some brewers use pre-heated water (just-boiled) to speed up the process and reduce heat exposure to the coffee in the basket. Either method works — cold water produces a longer, slower brew; hot water is slightly faster.
Step 2: Fill the Filter Basket
Set the filter basket into the bottom boiler. Fill it with ground coffee, leveling it off with a finger or the back of a spoon. Do not tamp or press the coffee down — this is the single most important technique difference from espresso. The steam needs to push through the grounds; tamping increases resistance past the safe pressure range and can produce bitter, over-extracted coffee or even a dangerous pressure buildup.
Fill the basket completely but loosely, and wipe away any grounds that land on the rim where the basket threads into the boiler — stray grounds can prevent a good seal.
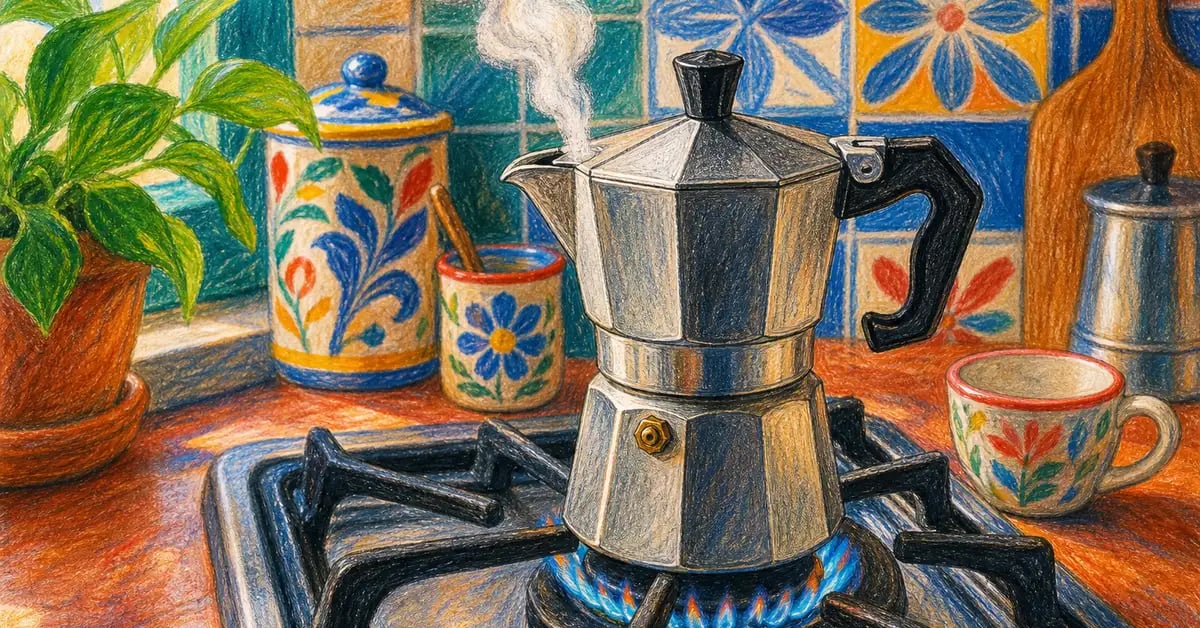
Step 3: Assemble and Place on Heat
Screw the top collector firmly onto the bottom boiler. Use a cloth or oven glove if the lower chamber is already warm. Make sure the threads are fully engaged — a loose connection can cause steam leaks or prevent proper pressure buildup.
Place the assembled pot on a burner set to medium-low heat. If using a gas stove, the flame should not extend beyond the base of the pot. High heat scorches the coffee in the basket before it brews properly; medium-low heat produces a slower, more even extraction.
Step 4: Watch and Listen
Leave the lid of the top collector open so you can see (and hear) what's happening. As the water heats, steam pressure builds in the boiler and forces hot water up through the basket and into the top chamber.
You'll first see a thin trickle of dark coffee emerge, then a steady stream, then — crucially — the flow will start to sputter and turn from deep brown to pale gold. This is the sign that most of the water has moved from the boiler and you're now getting steam, not water.
Step 5: Remove from Heat Immediately
The moment you hear the characteristic gurgling-hiss and see coffee turning lighter in color, remove the pot from the heat. Do not wait until the gurgling stops — that means you've extracted the last drops of water and the coffee in the basket is being hit by dry steam, which creates a burnt, bitter taste.
Immediately run the cold tap over the base of the pot for 5–10 seconds. This rapid cooling halts extraction and stops the coffee already in the top chamber from continuing to cook against the hot metal.
Step 6: Pour and Serve
Stir the coffee in the top chamber gently before pouring — the first drops through are the most concentrated, and stirring gives you a more even cup. Pour slowly. Moka pot coffee is very strong and is typically served black or with a small amount of milk or foam as the base for a macchiato or stovetop latte.
A 3-cup moka pot produces around 150–180ml of strong coffee — enough for one large cup or two small ones. A 6-cup pot produces around 300ml.
Moka Pot Tips for Better Results
A few refinements that make a real difference:
5 Tips for a Better Moka Pot Brew
- Start with cold water — or use pre-heated water from a kettle; both work. Pre-heated water means less time on the heat and less chance of scorching.
- Never tamp the coffee — fill loosely and level. This is the most common mistake.
- Use medium-low heat — a slow brew extracts more evenly. High heat = bitter coffee.
- Remove at the first gurgle — don't wait for the pot to finish; stop it early and cool the base immediately.
- Keep the valve clear — if your pot has a rubber gasket and it's old or hardened, replace it. A leaky seal produces weak coffee. Gaskets cost a few dollars and last 1–2 years.
Troubleshooting Common Moka Pot Problems
| Problem | Likely Cause | Fix |
|---|---|---|
| Coffee tastes bitter | Heat too high, grind too fine, or letting it brew past the gurgle | Lower heat, coarsen grind, remove earlier |
| Coffee tastes weak or sour | Grind too coarse, not enough coffee in basket, or water level too low | Fill basket fully, use medium-fine grind |
| Coffee spatters or sprays | Heat too high, grind too fine, or damaged gasket | Lower heat, coarsen grind, check gasket |
| Coffee barely comes out | Clogged filter, gasket failure, or blocked safety valve | Clean all parts, replace gasket if cracked |
| Steam leaking from sides | Pot not assembled tightly, or worn gasket | Tighten the two halves; replace gasket |
How We Researched This Guide
This guide draws on technical brewing references including the Specialty Coffee Association's brewing protocols and comparative brewing temperature data. Moka pot characteristics (pressure, extraction temperature, concentration) are described accurately per published industry sources. We don't own a physical test lab, so these recommendations are research-led and grounded in the principles of how steam-pressure brewing actually works.
Ready to Pick a Moka Pot?
See our research-led picks for the best moka pots of 2026 — from the classic Bialetti to induction-compatible options, with honest verdicts at every price point.
See the Best Moka Pots →Frequently Asked Questions About Moka Pot Brewing
Do I need to use espresso-ground coffee for a moka pot?
No — and actually, true espresso grind is usually too fine for a moka pot. It creates excessive resistance, increases pressure beyond the design limit, and produces bitter, over-extracted coffee. Aim for medium-fine: finer than drip but coarser than espresso. Most pre-ground "espresso blends" at the grocery store work well; a burr grinder lets you dial in precisely.
Can I use a moka pot on an induction stove?
Only if it's made from magnetic stainless steel, not aluminum. The original Bialetti Moka Express is aluminum and won't work on induction. Bialetti's Moka Induction, Venus, and Kitty lines are stainless and induction-compatible. Alternatively, use a small induction adapter disk — around $10 — which sits on the burner and conducts heat to any moka pot.
How much coffee does a moka pot make?
Each "cup" in a moka pot is approximately 50–60ml — much smaller than a US cup (237ml). A 3-cup moka pot makes about 150–180ml of strong coffee; a 6-cup makes around 300ml. These are intended to be served in small espresso-sized servings, or diluted with water or milk for a longer drink.
Do I need to season a new moka pot?
Many people recommend brewing and discarding the first 2–3 pots to remove any metallic taste from a new aluminum moka pot. It's not strictly necessary, but it's a simple step that takes 15 minutes and is worth doing. Once the pot has patina from regular use, the coffee tastes cleaner and more rounded.
Why does my moka pot smell burnt?
Usually because the heat is too high, you left it on the stove too long past the gurgle, or the gasket is burning. Remove from heat the moment the gurgling starts — don't wait for the hissing-empty sound. Also check that the flame isn't extending up the sides of the pot (which can burn the handle and the coffee simultaneously).
Sources: Specialty Coffee Association Brewing Protocols; Bialetti product documentation; industry standard brewing temperature and pressure references for steam-pressure extraction.